

Channels and connected tools
Choose who sends your abandoned-cart follow-up emails, connect Klaviyo, Omnisend or a webhook, test the connection, and see the events your tool can build automations on.
By default SureBright sends every abandoned-cart offer as a Shopify invoice email, as described in Abandoned Cart Recovery. If you already email shoppers from your own tool, you can have that tool send the offers instead. SureBright still finds the cart, picks the plan and, when the follow-up carries a discount, creates the single-use code. Your tool sends the message with your design, your sending domain and your reporting.
You set this up in the Merchant Portal under Abandoned Cart → Messages → Connected tools, on stores where Abandoned Cart is switched on.
Who sends your follow-up emails#
The first card asks Who sends your abandoned-cart follow-up emails?
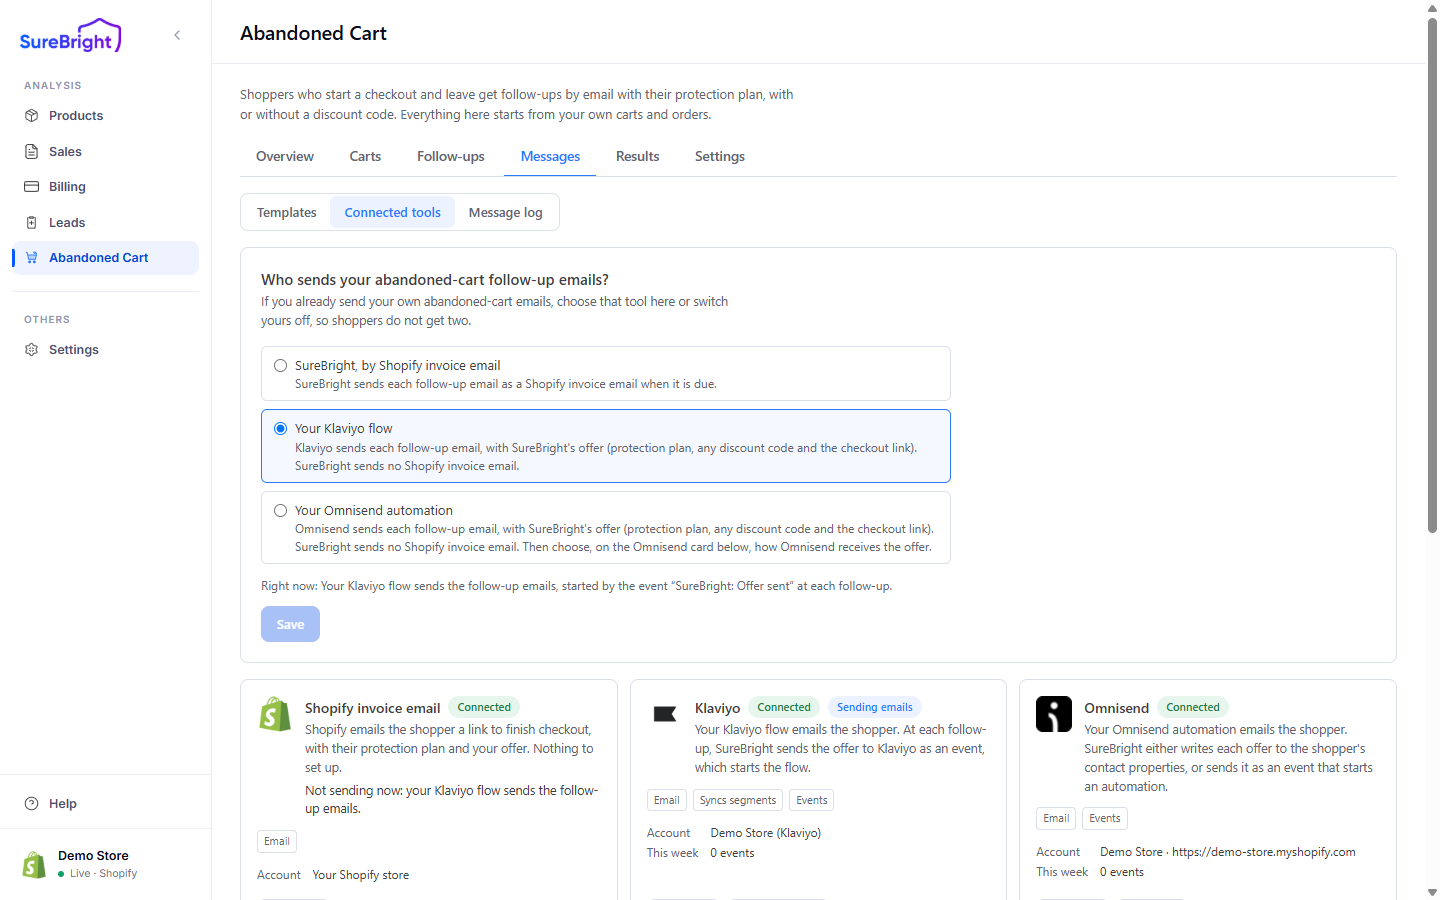
Press Save after choosing. If you disconnect the tool that sends your follow-up emails, no follow-up email goes out until you choose a sender again.
If you keep your own abandoned-cart emails running, choose your tool here or switch yours off, so shoppers do not get two emails. When your Klaviyo flow or Omnisend automation sends them, a Right now: line under the choice says how offers reach shoppers. Your tool gets offers automatically only while automatic follow-ups are switched on; an offer you send from a cart still goes to it (see Automatic follow-ups). If SureBright finds live Klaviyo flows that already email abandoned carts, it lists them here, so you can avoid two emails.
What each connected tool does#
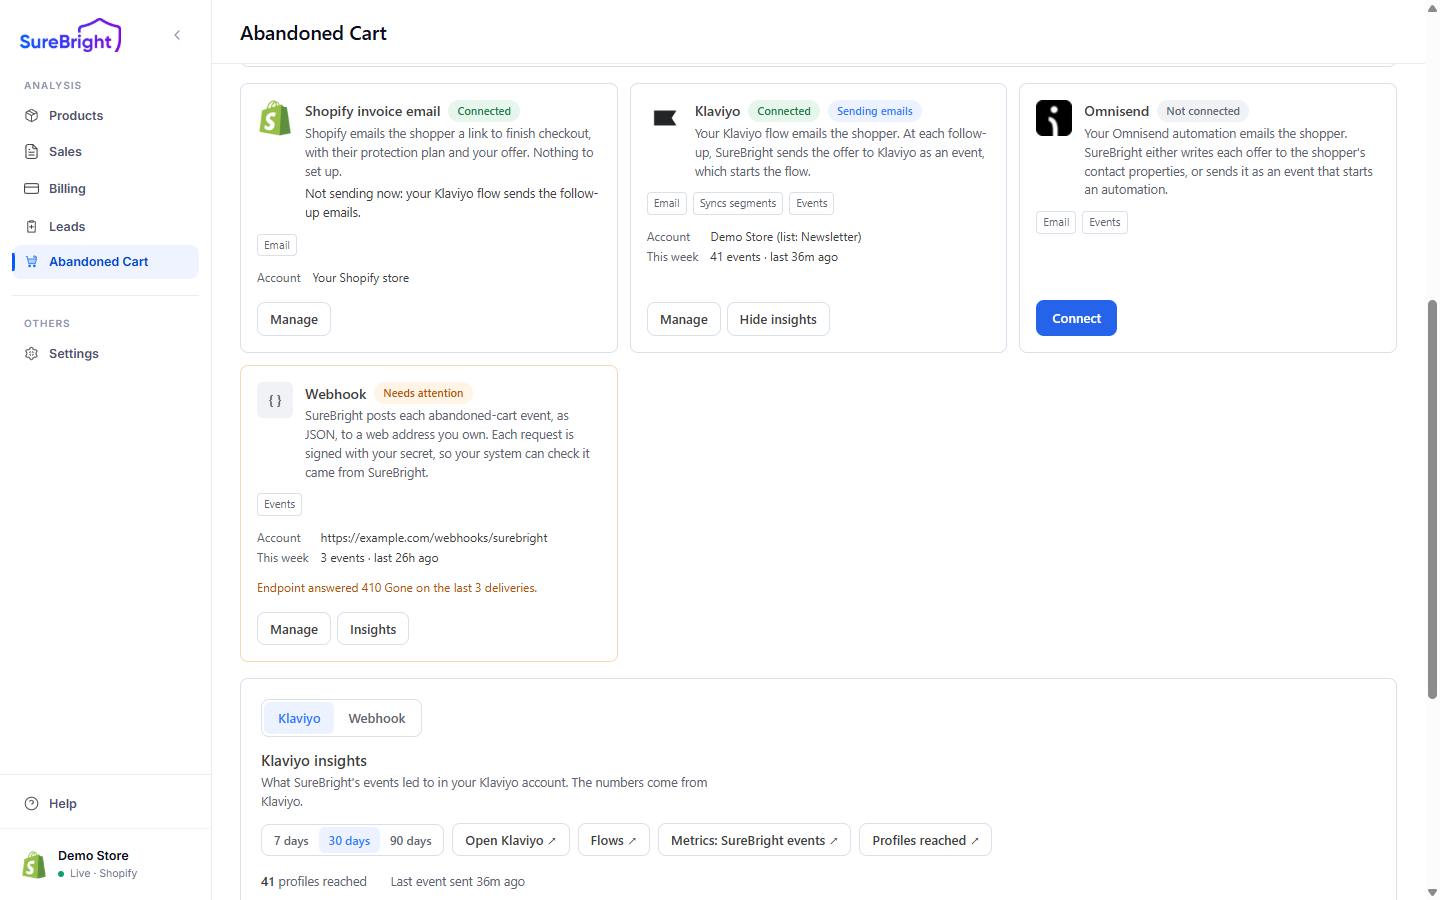
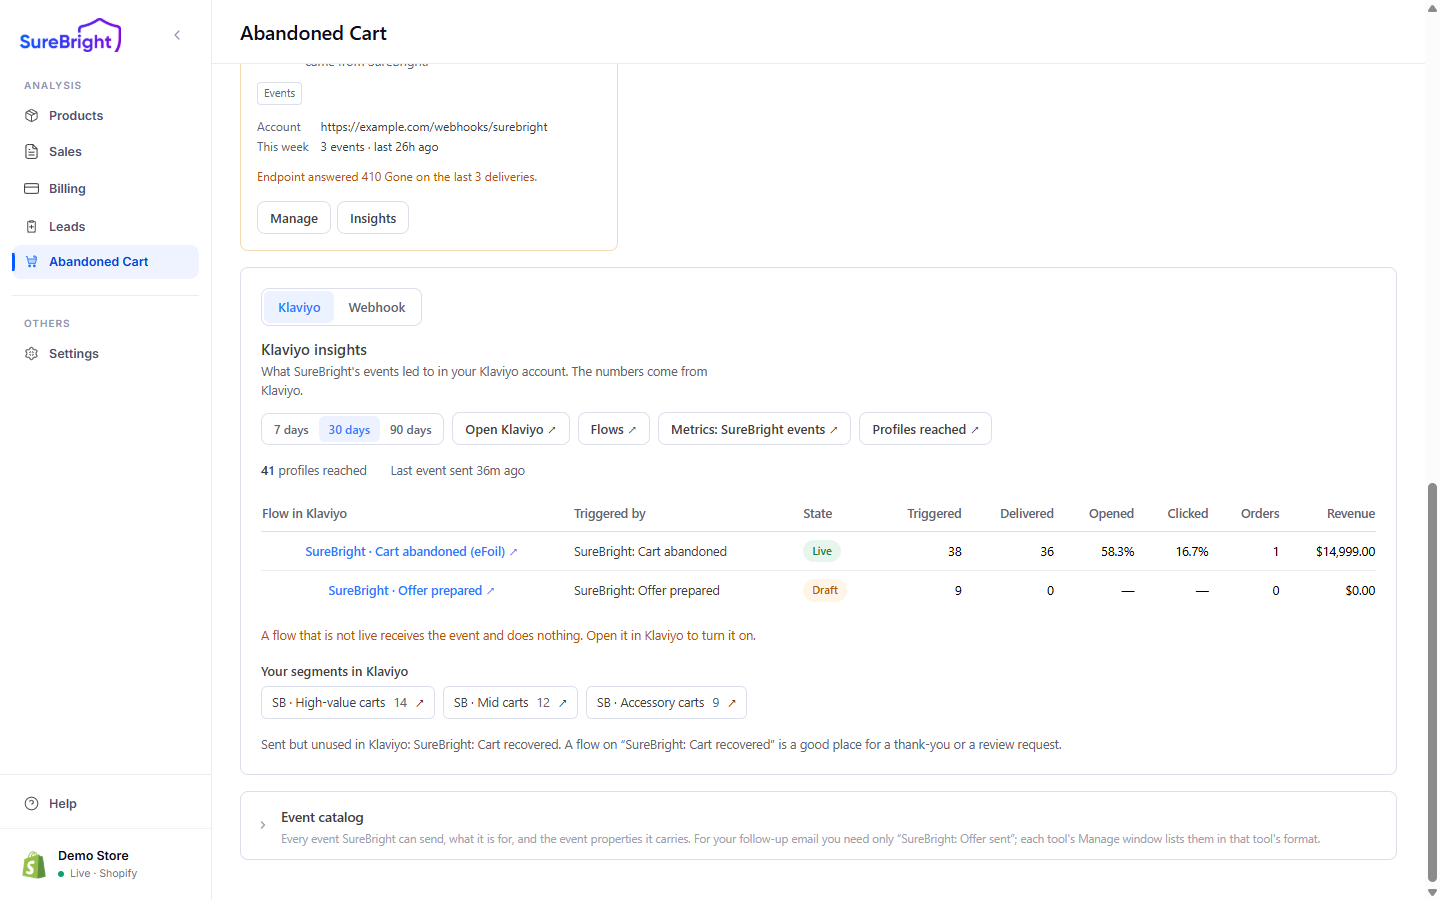
Each card shows the tool's status (Connected, Not connected, Needs attention) and the account it is connected as. Once connected, an Insights section lists the flows in your tool triggered by SureBright events in the last 7, 30 or 90 days with Triggered, Delivered, Opened, Clicked, Orders and Revenue, using the tool's own numbers.
Connect a tool#
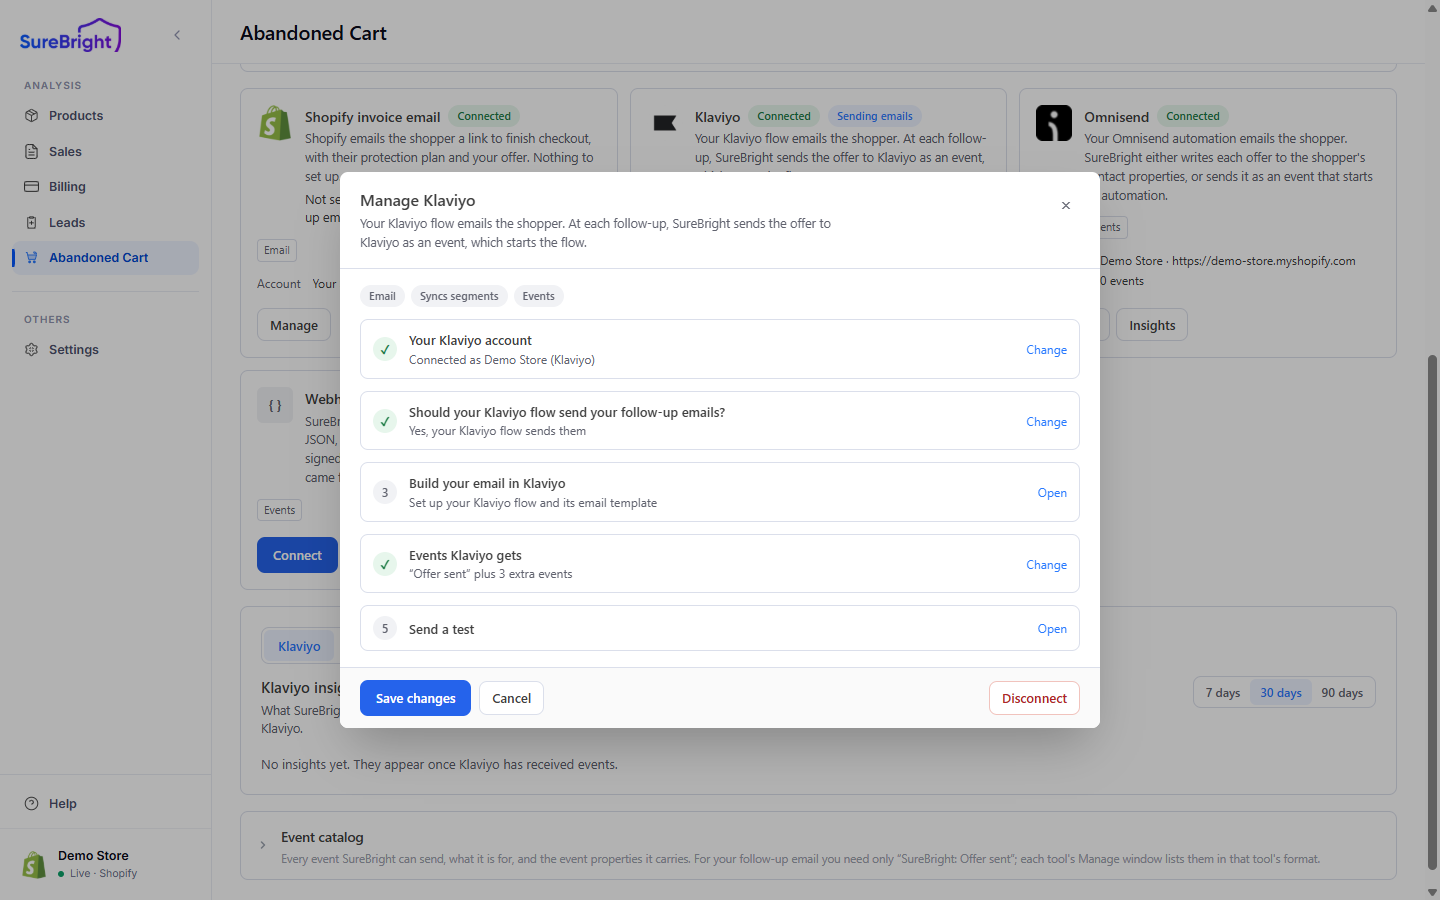
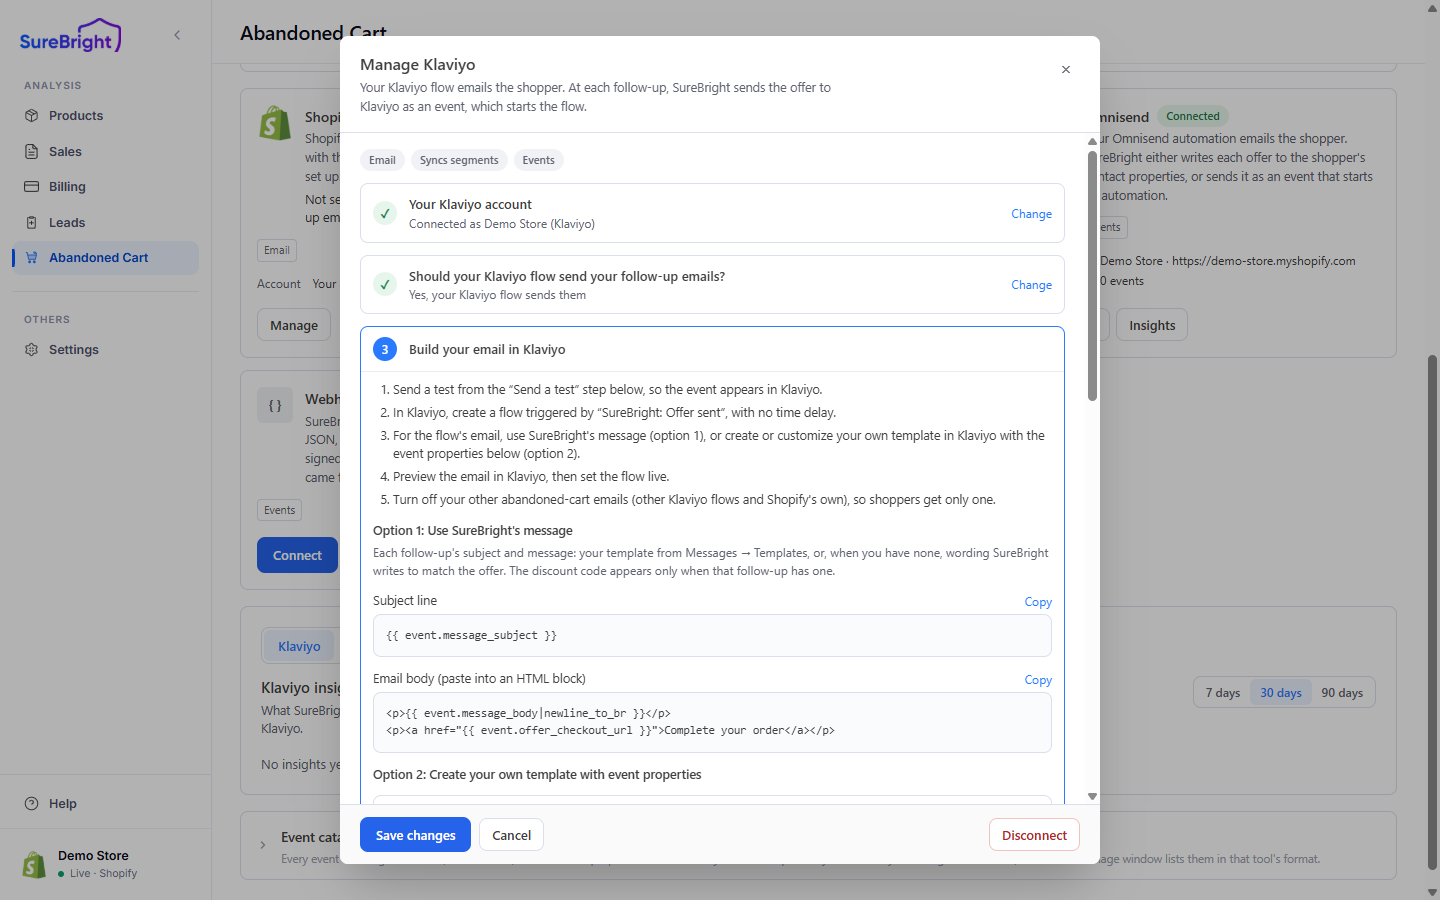
Manage on a connected tool's card opens its window, with each step and a tick once it is done.
Paste the key
Press Connect on the tool's card, paste the key or endpoint URL and follow Where to find it in the tool.
Make the tool the sender
Klaviyo's window asks Should your Klaviyo flow send your follow-up emails? Answer Yes, my Klaviyo flow sends them to make it the sender. For Omnisend, choosing how it gets the offer makes it the sender; see How Omnisend gets the offer below. You can change this later under Who sends your abandoned-cart follow-up emails?
Choose the events
For Klaviyo, and Omnisend with Send as event, SureBright: Offer sent is always on: it starts your follow-up email. Tick an optional extra event only if you will build a flow on it. For the Webhook, tick the events you want posted.
Keep your segments in the tool (Klaviyo)
With customer segments on, Keep your segments in Klaviyo turns each enabled segment into a Klaviyo list named SB · segment name, updated every hour while Klaviyo sends your follow-up emails. Its key needs Lists and Profiles full access.
Connect
Press Connect Klaviyo, Connect Omnisend or Connect Webhook at the bottom of the window. Connecting sends nothing to shoppers.
Send a test
Open the tool's window again with Manage. Send a test (button Send test) sends one SureBright: Offer sent event (Klaviyo, Omnisend's event path) or SureBright: Offer prepared event (Webhook) for an email address you enter, so the event appears in the tool. When Omnisend gets the offer on the contact, this step is Try it on a contact instead. Save changes first so the test runs the way you just chose.
In Klaviyo's window, Build your email in Klaviyo lists the steps to build the flow on SureBright: Offer sent, the subject line and email body to paste, and every event property you can use in your own template.
Connect a webhook#
Press Connect on the Webhook card to open Connect Webhook. SureBright posts each abandoned-cart event, as JSON, to a web address you own.
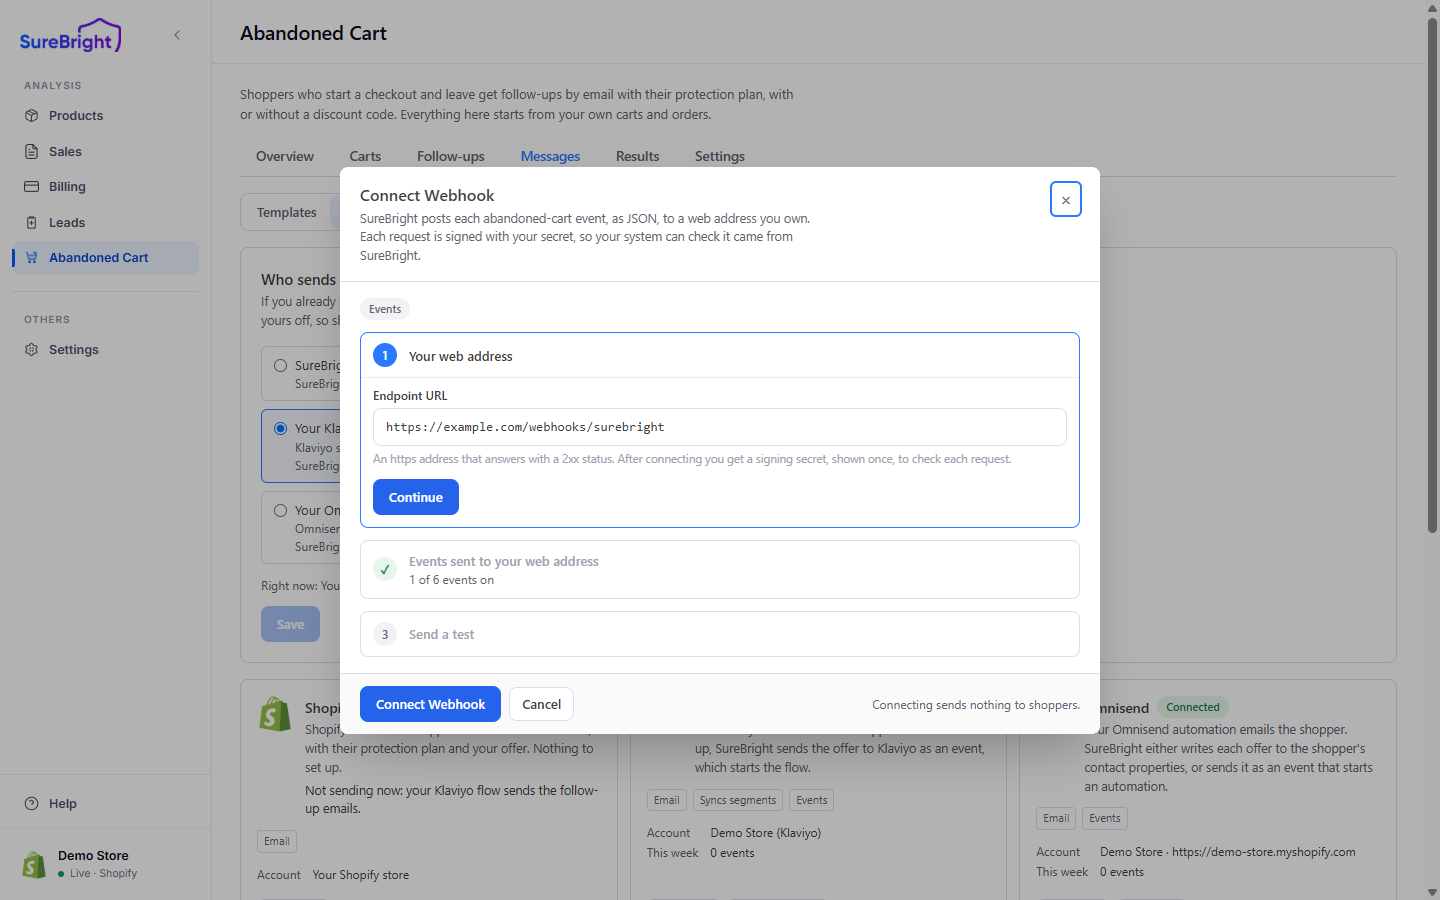
Your web address: paste your https Endpoint URL and press Continue. It must answer with a success (2xx) response.
Events sent to your web address: tick the events you want posted.
Press Connect Webhook. Connecting sends nothing to shoppers.
Send a test opens once you are connected: it posts one sample event so you can check your endpoint receives it.
After you connect, a signing secret is shown once, so copy it then. If it is lost, Replace secret in the webhook's window makes a new one. Give it to your developer so your endpoint can check that each request came from SureBright. The request format is on Notifications and webhooks.
How Omnisend gets the offer#
Omnisend can carry the offer in two ways. Press Manage on the Omnisend card; step 2 of its window, How your Omnisend emails get the offer, holds the choice. Either way, your Omnisend automation sends the emails, not SureBright.
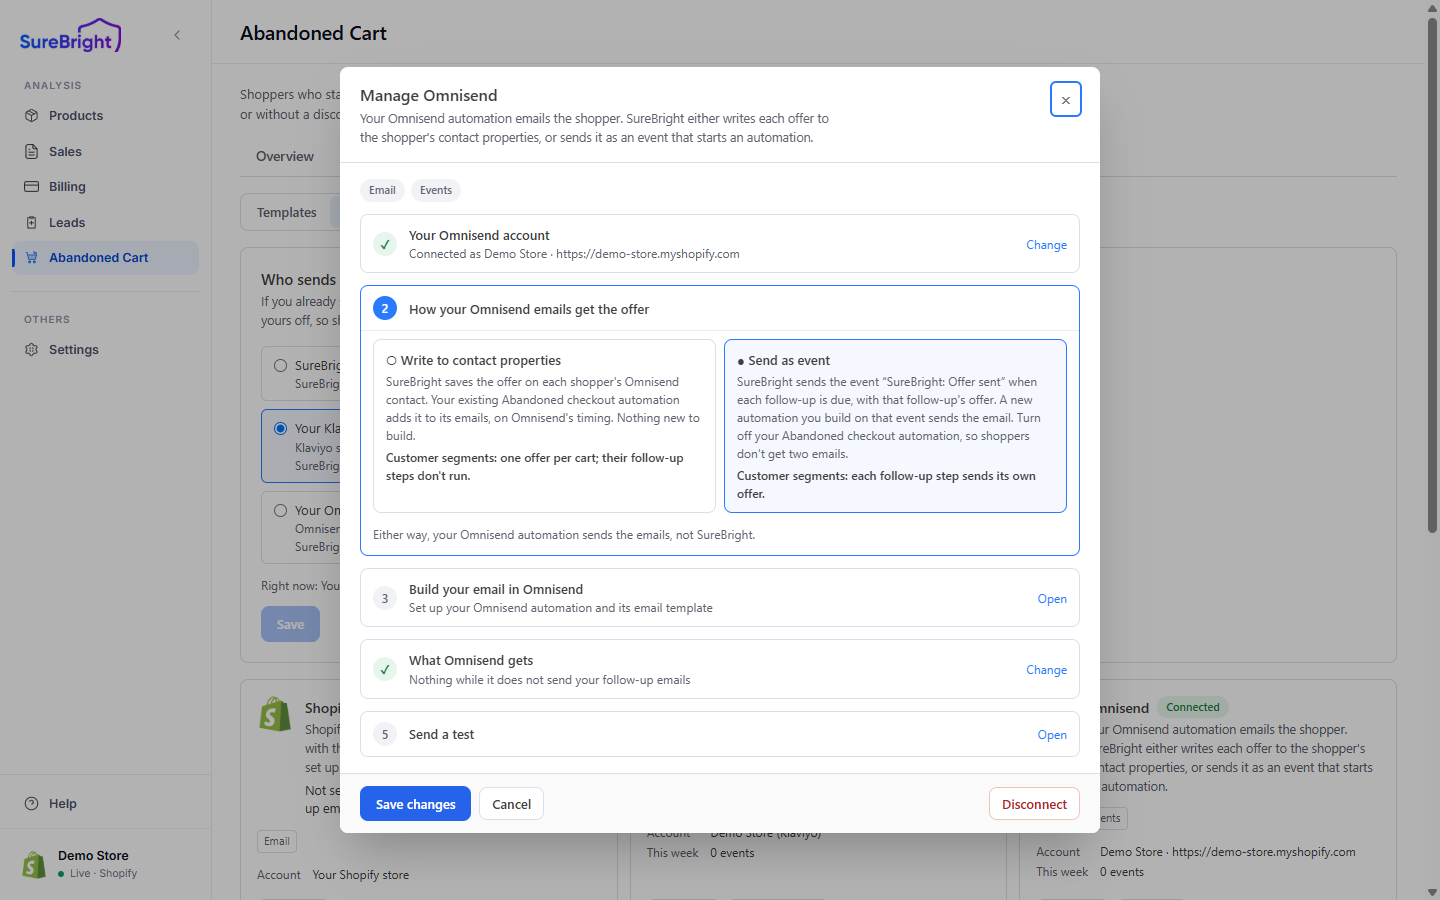
The rest of the window walks you through building your email in Omnisend, the events it gets, and a test. Press Save changes when you are done.
Omnisend automations started by a custom event also email contacts who are not subscribed, unless you change that in the trigger's channel settings.
Either way, switch off Shopify's own abandoned checkout email in Shopify. Try it on a contact (Add sample properties) puts sample offer fields on a contact you name, ideally your own, so you can preview the email. Remove them with Remove the sample properties when you are done. When you disconnect Omnisend you choose Remove the offers first, then disconnect or Disconnect and leave them. The step-by-step version is on Omnisend.
Events your tool receives#
Klaviyo and Omnisend receive these events only while they send your follow-up emails, and never Reminder due; with Write to contact properties, Omnisend receives none. The Webhook receives every event. The names match what appears in the tool. Cart abandoned, Offer prepared, Reminder due and Code expiring go out only while automatic follow-ups are on, never for a cart in a control group, and never for a shopper without marketing consent when Settings asks for it.
The full field list for each event is in the Event catalog at the bottom of the Connected tools screen. Open it to see, for each event, what to use it for, when it is sent and every field it carries, so you know which tags you can put in your email or automation.
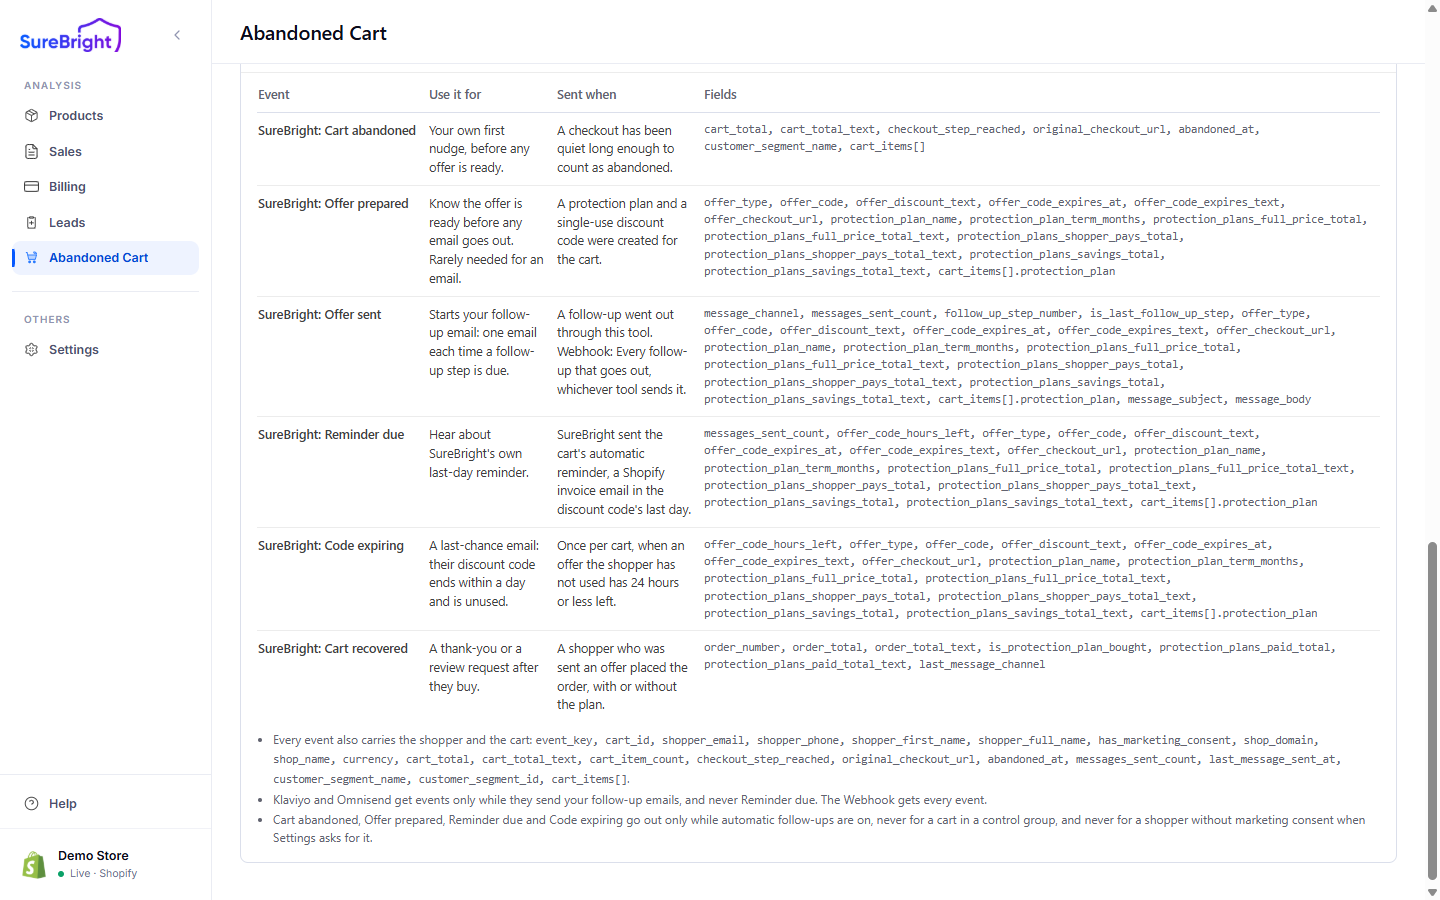
Every event also carries the shopper and the cart: their email, phone and name, marketing consent, your shop name and currency, the cart total and items, the checkout step reached, the customer segment, and how many messages were sent so far.
Send a campaign to a segment#
With customer segments on and Klaviyo connected, a segment's panel (open it with Insights) offers Send a campaign under Campaigns to this segment: one message to everyone in the segment at once, created in your Klaviyo account on a synced list. The Klaviyo key needs Campaigns, Templates, Lists and Profiles full access.
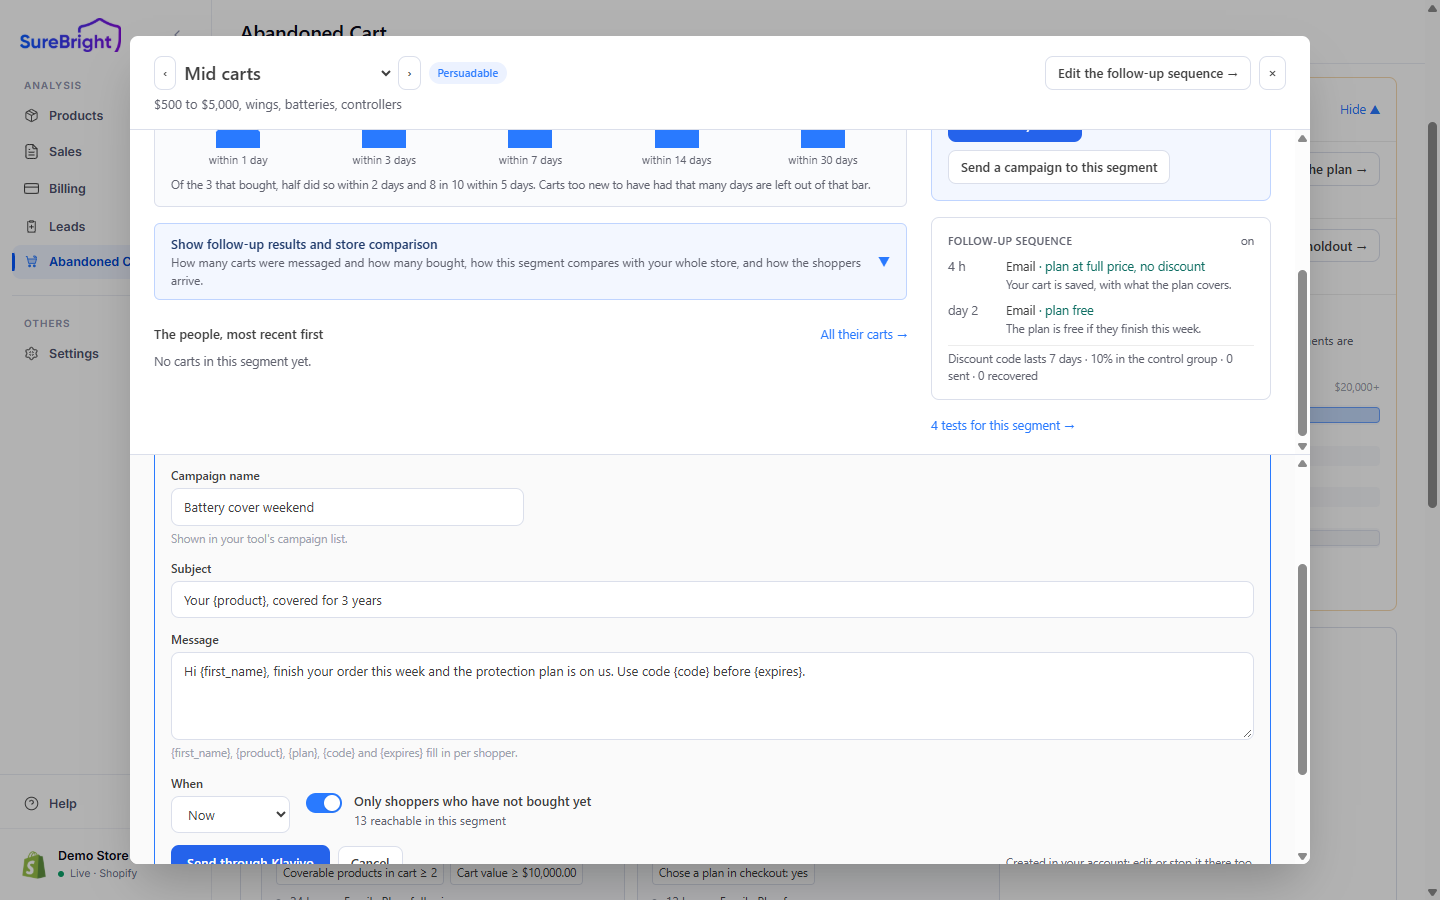
Name it and write the message
Write the subject and message.
{first_name},{product},{plan},{code}and{expires}fill in per shopper, each with their own single-use code.Choose when and who
Choose Now or Schedule, and optionally Only shoppers who have not bought yet.
Confirm
For Now, the confirmation names the tool, the segment and how many shoppers it will reach. A scheduled campaign can also be cancelled here in the portal. The campaign then appears in Klaviyo's campaign list, where you can also edit or stop it.
Only Klaviyo can keep your segments as lists and send campaigns from here.
A campaign cannot be recalled once sent.